The RØDECaster Video Core, the smallest one.
The Core is what RØDE made for the solo creator who doesn't want to operate a switcher mid-show. It auto-switches for you — based on which microphone is active — while still giving you the same studio-grade audio mixer and three HDMI cameras as its bigger siblings.
It's the “just make it work” version.
The RØDECaster Video Core is the most stripped-down of the three RØDECaster Video boxes. No physical faders. No giant touchscreen. What it has instead is auto-switching: tell it which microphone belongs to which camera, and the Core will cut to the right camera whenever a new mic becomes active. For a solo creator interviewing one guest, this single feature replaces the whole "mid-show I have to remember to switch cameras" problem.
It still has serious audio — two XLR/TRS combo inputs with the same Revolution Preamps and APHEX processing as the bigger units. So the trade isn't quality, it's physical control surface. You give up faders and a touchscreen, you get a smaller box and a much lower price.
The same RØDECaster Video DNA in a compact case, designed for creators who want to focus on the conversation, not the console.
Where it sits in the family.
- Same: 3 HDMI inputs, Revolution Preamps, APHEX audio processing, NDI output, RØDECaster app control.
- Less than the Video S: No touchscreen-driven manual switching. No second headphone output. (One headphone out, not two.)
- Less than the original Video: Fewer HDMI inputs, no faders, no second USB-C input, no DaVinci EDL export.
- More than either: Auto-switching driven by microphone activity. RØDECaster Sync — can chain to a RØDECaster Pro II or Duo audio mixer to massively expand the audio side.
- Form factor: Smallest of the three. Easiest to throw in a backpack, easiest to set up on a small desk.
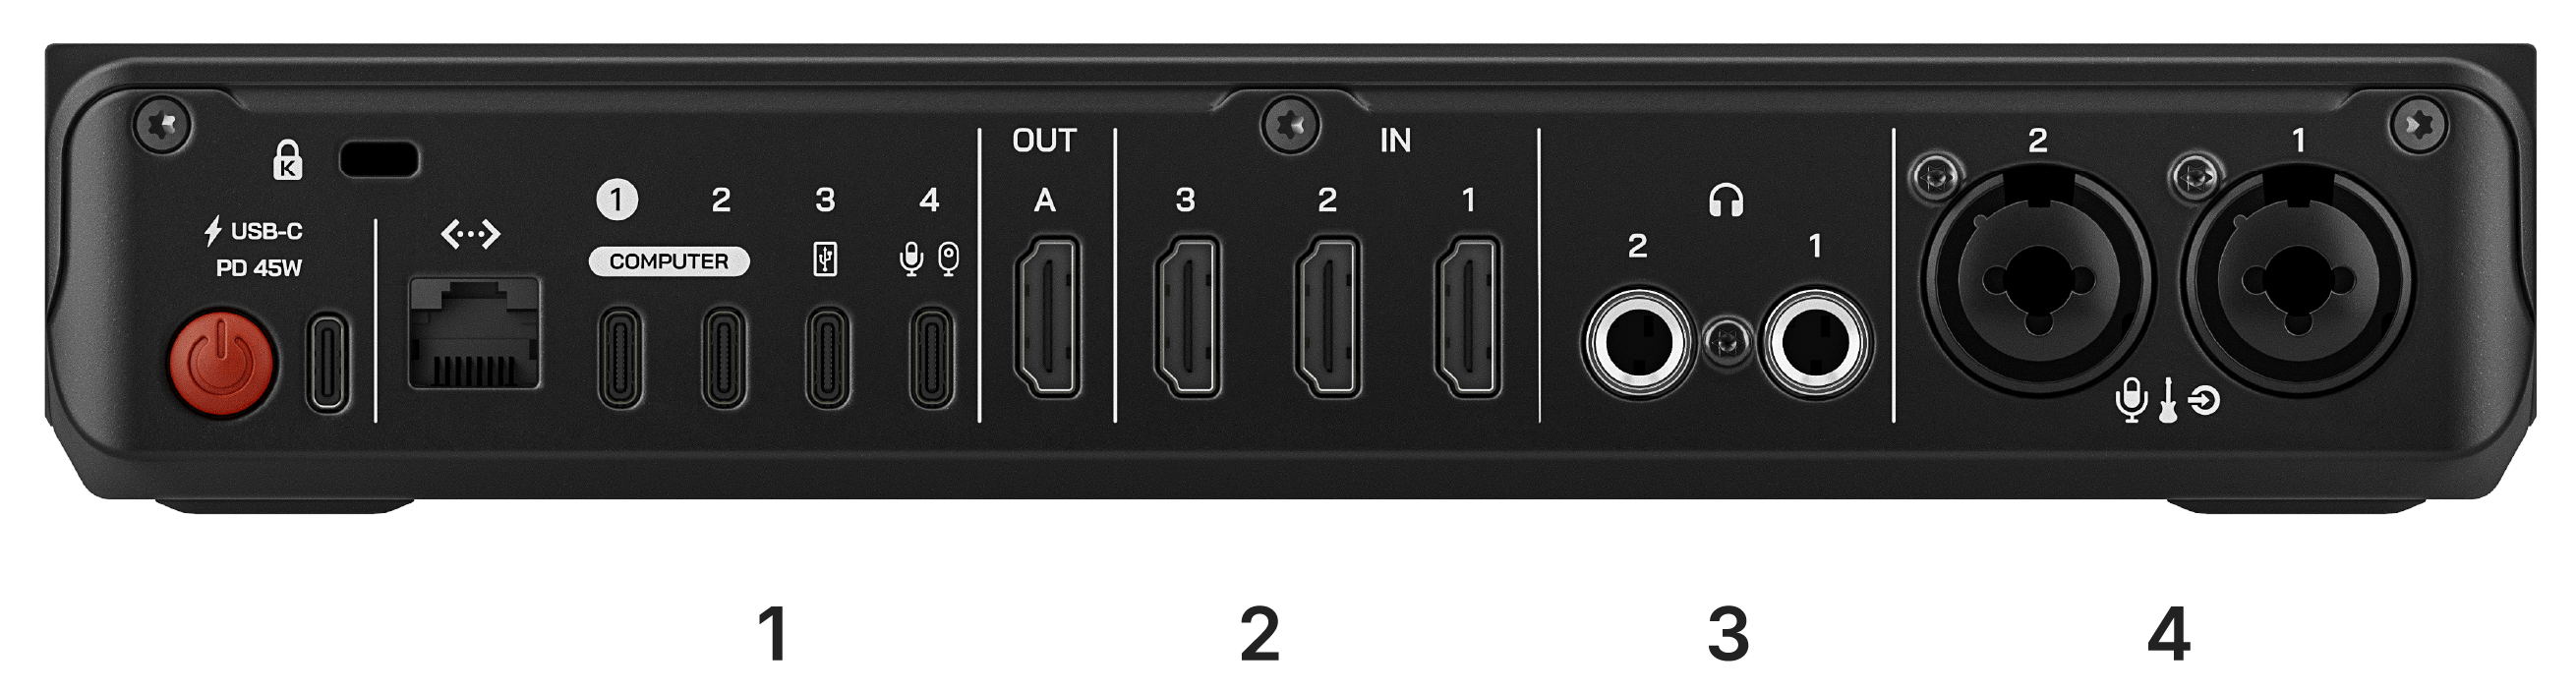
Every socket on the back, in plain English.
Holding it and looking at the back, this is the inventory:
The trick that makes the Core worth its price.
Here's the idea: in the RØDECaster app, you assign each microphone to a camera. Mic 1 → Camera 1. Mic 2 → Camera 2. From that moment on, whenever someone starts talking on Mic 2, the Core automatically cuts to Camera 2. When they stop and the host starts on Mic 1, it cuts back. No tapping the screen, no fader to ride, no “wait, was that a good cut?”
For a one-host-one-guest podcast with two cameras, this is roughly 90% of what you'd manually do during a manual edit, performed live. You can override it with manual cuts when you want to, but the default is hands-off.
One host, one guest, two cameras — classic interview show. Auto-switching makes this look shockingly good with zero operator attention.
Three or more people talking over each other. The Core can do it, but the cuts get jumpy — hop to the bigger Video S or original Video for that scenario, where you can ride the touchscreen or faders manually.
From "still in the box" to "first picture on screen."
- Plug power in last. Camera into HDMI IN 1, microphone into XLR/TRS 1, headphones, HDMI cable from HDMI OUT to a TV. Then power.
- Wait for the front-panel display to come up. The Core has a small status display, not a full touchscreen — most setup happens through the RØDECaster app on your phone or computer.
- Connect to the RØDECaster app. Download the app, pair the Core via Wi-Fi or USB. The app is where you'll do most configuration — mic-to-camera mapping, audio levels, scenes.
- Verify the camera shows on the TV. If it's black, the camera's HDMI overlay is on — turn off "HDMI Info Display" in the camera menu.
- Verify the microphone level moves. Talk into the mic. The level meter in the app should respond. If not, the channel is muted, gain is at zero, or the mic needs phantom power (toggle from the app).
- That's it for one source. Add a second camera and second mic the same way, then turn on auto-switching.
The Core's secret superpower.
The Core has a feature the other two don't: RØDECaster Sync. Plug a RØDECaster Pro II or RØDECaster Duo (RØDE's dedicated audio mixers) directly into the Core, and the audio mixer becomes the Core's audio engine — you get all of the Pro II's faders, pads, mute groups, and effects, with the Core handling the video. It's the "build a real podcast studio in stages" upgrade path.
This means a creator who already has a RØDECaster Pro II for podcasting can add the Core as a smaller, cheaper way to get into video without buying the full Video or Video S, and end up with audio that's actually better than either.
Things that look broken but aren't.
- Auto-switching cuts mid-sentence. Sensitivity is in the app — reduce it. The Core has a "hold time" setting that prevents quick cuts during natural pauses.
- Black HDMI input. Almost always the camera, not the Core. Look for "Clean HDMI" or "Info Display: Off" on the camera.
- USB webcam doesn't appear. The webcam is sending compressed video. Needs uncompressed YUV/NV12. Why →
- Only one headphone output. Not a defect — that's the spec. If you need two independent mixes for host plus guest, the Video S or original Video is the better fit.
- App can't find the unit. Phone and Core need to be on the same network. If your home Wi-Fi has guest isolation enabled, devices can't see each other — turn it off or use Ethernet.
Once the basics are working.
- Auto-switching tuning. Sensitivity, hold time, mic-to-camera mapping. Once tuned, the Core just runs.
- Scenes and layouts. Pre-built screen arrangements, accessible from the app or the front-panel buttons.
- Streaming directly to YouTube / Twitch. The Core can stream straight without a computer in the chain. Wired Ethernet beats Wi-Fi for stream stability.
- RØDECaster Sync chain. If you already have or are considering a Pro II / Duo, the Sync chain unlocks pro audio with this video unit.
- Pair with an ATEM Mini Pro. If you outgrow the Core's switching but love its audio — see the tandem guide.