The ATEM Mini Extreme family.
The Mini that grew up. Eight HDMI inputs, four chroma keyers, 16-way multiview, two HDMI outputs, and — in the new G2 model — Thunderbolt, CFexpress recording, and 10G Ethernet. This is what you reach for when four cameras isn't enough.
The Mini for productions that aren't actually mini anymore.
The Extreme is what happens when the ATEM Mini Pro starts running out of inputs. Eight HDMI cameras instead of four. Two HDMI outputs instead of one. Four chroma keyers instead of one. SuperSource (a 4-window picture-in-picture engine). MADI digital audio in. The list keeps going.
It also keeps the things people love about the Pro: hardware streaming directly to RTMP/SRT, USB-C webcam output, real buttons, ATEM Software Control. You're paying for capacity and headroom, not a different philosophy.
An ATEM Mini Pro with twice the inputs, twice the outputs, four times the keyers, and — in G2 form — genuinely professional connectivity like Thunderbolt and CFexpress.
Extreme vs. Extreme ISO G2.
There are effectively two Extreme models sold today:
- ATEM Mini Extreme · $1,095. The original Extreme. 8 HDMI in, 2 HDMI out, multiview, 4 chroma keyers, USB recording. No isolated recording per camera.
- ATEM Mini Extreme ISO G2 · $2,195. Adds isolated recording of each camera (the same idea as the RØDECaster Video's ISO recording), plus Thunderbolt 4, CFexpress recording, 10G Ethernet, and a built-in streaming engine that doesn't need a computer at all.
If you're choosing between them: the cheaper Extreme is plenty for live shows that don't need re-editing. The G2 is for productions that will be re-edited later, or that need recording at a quality higher than USB H.264 can deliver.
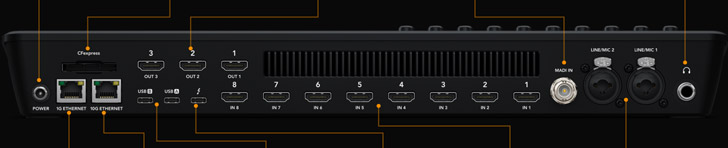
Every socket on the back, in plain English.
The Extreme ISO G2 has the most connectivity. The base Extreme is a subset (no Thunderbolt, no CFexpress, no MADI):
The Mini Pro had 3.5mm minijacks. The Extreme has actual XLR inputs, the kind you plug a real microphone into directly. If you've been pairing a Pro with an external audio interface just to get XLR, the Extreme alone might replace both.
The 16-way grid that lets you actually see your show.
The Extreme has 16-way multiview: a single HDMI output that shows you all eight cameras, plus the program feed, the preview feed, audio meters, the streaming status, and the recording status — all on one screen. Connect a single 1080p TV to HDMI OUT 2 and you have the production-control-room overview that the Pro can't deliver.
Without multiview, an 8-camera show would mean either trusting the touchscreen or stacking 8 monitors. With multiview, you have one screen that tells you everything. This is the single biggest reason to buy an Extreme rather than two Pros.
From "still in the box" to "first picture on screen."
- Plug power in last. Camera into HDMI IN 1, mic into XLR 1 (or 3.5mm minijack on the base model), headphones, HDMI cable from HDMI OUT 1 to a TV. Then power.
- Hit button 1 on top. Should cut to camera 1 immediately. Black screen? Camera HDMI overlay is on; turn off "HDMI Info Display" on the camera.
- Plug a second display into HDMI OUT 2 and switch it to multiview. Inside ATEM Software Control or via the front-panel menu. Now you can see all 8 inputs at once, even though you only have one camera connected.
- (Optional) Install ATEM Software Control. Required for stream key entry, fine keying, and more. Free Blackmagic download.
- Add cameras one at a time. Each new camera into the next HDMI input. Test each one separately before stringing them all together — saves debugging time.
The G2 model, in three sentences.
One: CFexpress recording lets you skip USB H.264 and capture broadcast-quality footage directly. Two: Thunderbolt 4 means you can record ISO streams (every camera as a separate file) directly to a connected computer without dropping frames. Three: A built-in streaming engine means you no longer need a computer in the chain at all, even for the initial setup — the G2 has its own onboard stream-key memory and encoder.
If you're producing live and want to re-edit afterward, or if you need broadcast-quality recordings, the G2 is the step up. If you're streaming live and don't care about post-production, the regular Extreme is half the price and does everything you need.
Things that look broken but aren't.
- Black screen on a camera input. Camera's HDMI overlay; turn it off.
- Multiview shows up but the layout is weird. Multiview layout is configurable in ATEM Software Control. The default works for 8 cameras; if you have fewer, it'll show empty boxes.
- CFexpress card not recognized (G2). Format the card in the ATEM, not on a computer. The ATEM uses a specific filesystem.
- Stream won't connect. Same as the Pro — either Ethernet isn't connected, or the stream key is wrong.
- "What's the difference between SuperSource and Picture-in-Picture?" SuperSource is 4 cameras combined into one virtual source with arbitrary positioning. PiP is just one source overlaid on another. SuperSource is more powerful but needs more configuration up front.
Once the basics are working.
- Multiview layout customization. Pin program and preview to the corners; arrange cameras spatially to match physical positions.
- Aux outputs. HDMI OUT 3 can be configured as aux — send a different camera (not program) to a recorder, a confidence monitor, or a separate destination. Useful for sending isolated talent feeds to a remote display.
- Macros, again. The Extreme has more buttons but the macro system is the same. Worth setting up reusable transitions for show segments you do every week.
- Pair with a RØDECaster Pro II for audio. Even the Extreme's XLR inputs aren't as good as a dedicated podcast mixer. For shows where audio quality matters more than minimizing rack space, MADI in from a Pro II is the studio-grade path.